
How To Make DIY Bokashi Flakes
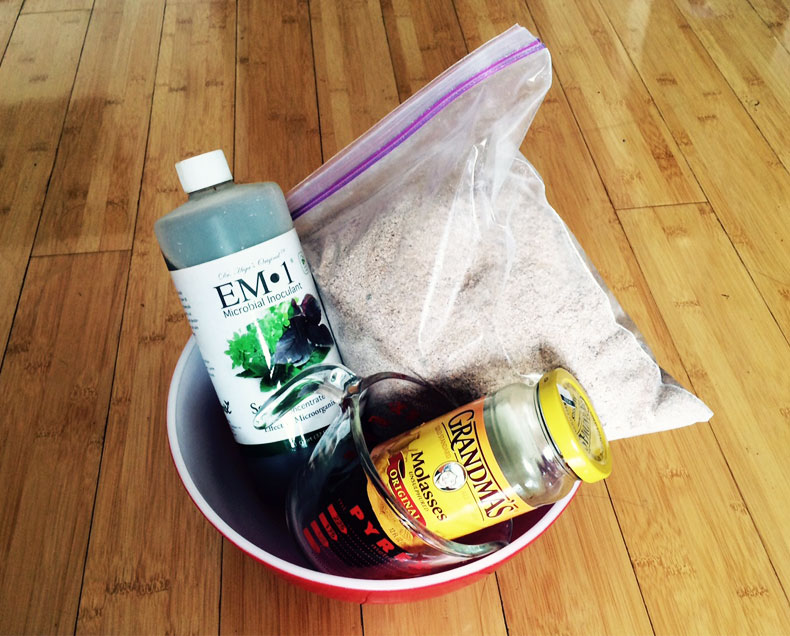
The lead players in the theater of making bokashi flakes!
For the longest time, I thought worms were the love of my compost life. Cute, easy to care for, discreet when tucked in a cabinet or under the sink…
But recently, I’ve wiggled away from Red Wiggler earthworms (mostly Friend Zone now) to embrace my Bokashi Buckets — airtight containers in which I ferment food scraps before burying them in soil. Once buried (or mixed into an aerobic compost pile) they fully decompose and transform into lovely, luscious earth.
Bokashi, a Japanese word meaning fermented organic matter, doesn’t discriminate. As with worm bins, I can process fruit and veggie scraps in my bucket. BUT, I can ALSO process meat, dairy, cooked foods, ancient condiments and mysteries from the back of the fridge. All these latter items create chaos in a worm bin ecosystem and in general are best kept out of aerobic compost piles to avoid odor and pests. Bokashi is a food waste recycler’s dream!
Maintaining a bokashi bucket is mindlessly easy (keep your eyes peeled for a how-to, coming up in a future post). All the hard work of fermentation is done by a powerful trio of anaerobic microbes called Effective Microorganisms (lactobacillus bacteria, phototrophic bacteria and yeast). They are sprinkled onto food scraps via an inoculated material often called bokashi bran, as wheat bran is a popular ingredient. I prefer the more generic term “bokashi flakes,” as any easily spreadable plant-based carbon material that can dust scraps like snowflakes will do. I’ve known folks who have used coffee chaff, sawdust and dry, crumpled leaves with great success.
While bokashi flakes are readily available for purchase online, they are also super simple to make. If you’d like to save some cash, enjoy DIY projects, and have a few weeks to spare to allow your bokashi flakes to ferment and subsequently dry for long-term use and storage, follow the steps below to make bokashi flakes yourself!
The following recipe is adapted from the guidelines provided by Teraganix, a distributor of a liquid form of Effective Microorganisms called EM-1. Their base recipe calls for 10 lbs of flake material. I have adjusted it for 3 lbs of wheat bran, which is roughly the amount in the plastic bag pictured above, is easy to make in my apartment and lasts for several months for a household of 2 .
Materials:
- 1.5 TB EM-1 Some people make their own microbe solution from every day items but it can be difficult to ensure optimized populations of each microbe group when collecting from the wild. I’ve tried it, with varying results. These days, I just stick to EM-1 for consistency.
- 3 lb. Flake material Wheat bran can be purchased from an animal feed store for about $15 for 50 pounds. Considering a 2 lb bag of finished bokashi flakes can cost upwards of $15, you’re in for some serious savings! If you’re a savvy scrounger, you can freecycle items like coffee chaff, leaves, and untreated sawdust as well.
- 1.5 TB Molasses This serves as fuel for the microbes. I’ve been using a bottle I got years ago during my ginger snap baking era which, come to think of it, I should resurrect.
- 3 cups Water
- Container for mixing Make sure it’s big enough to hold your flake material and then some, as you’ll be mixing the flakes around and you don’t want to spill them all over your counter.
- Plastic bag A reused grocery store bag or a trash bag will do. Make sure there are no holes in the plastic.
Instructions
- Dissolve the molasses in the water.
- Add EM-1 to the water mix.
- Pour dry flake material into the mixing container.
- Add 2/3 of the water mixture to the flake material and mix it together. Use your hands! It not only feels good, but is vital to determining when you’ve achieved the ideal moisture level.
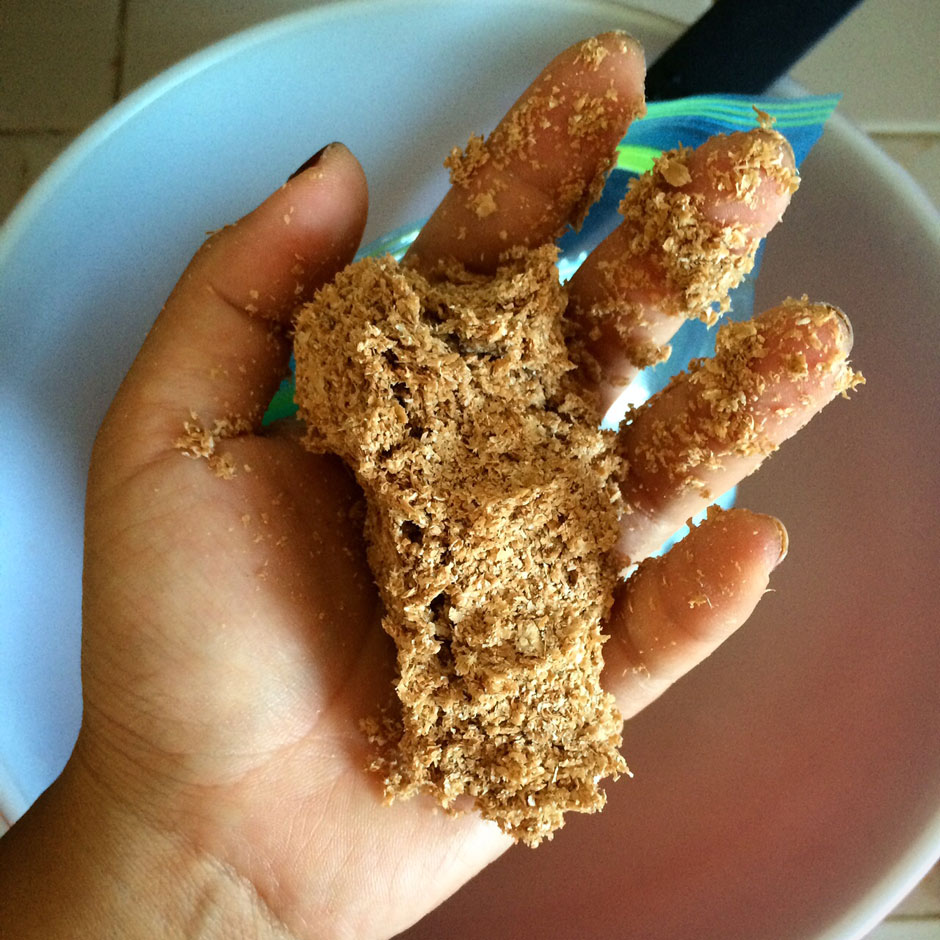
- Squeeze a handful of flakes together.
- If it sticks together without dripping, as seen in the picture below, it’s perfect! Continue to the next section!
- If it crumbles apart like dust, it’s too dry. Slowly add the remaining liquid to your flakes, pausing periodically to squeeze test it until it achieves the conditions described above.
- If liquid oozes from the flakes, it’s too wet. Add more dry flake material until it achieves the conditions described above.

The squeeze test always reveals if you’ve hit the right moisture balance! This handful is perfect!
- Once you’ve achieved the proper moisture level, put the dampened flakes into the plastic bag. Compress the bag contents to squeeze out as much air as you can from between the flakes and throughout the bag.
- Twist or tie the bag closed, sealing the flakes in a private, air-tight universe.
- Keep the bag in a warm, out-of-the-way corner like a cupboard or cabinet for a minimum of two weeks. In this quiet, dark, airless space, the microbes will ferment the flakes.
- After a few weeks have passed, open the bag. It should have a sweet, yeast-y smell to it. You may see white mold on it, which is totally fine. If you see green/blue/black mold, something went wrong and the wrong microbes cultivated. Compost the bad batch and start over.
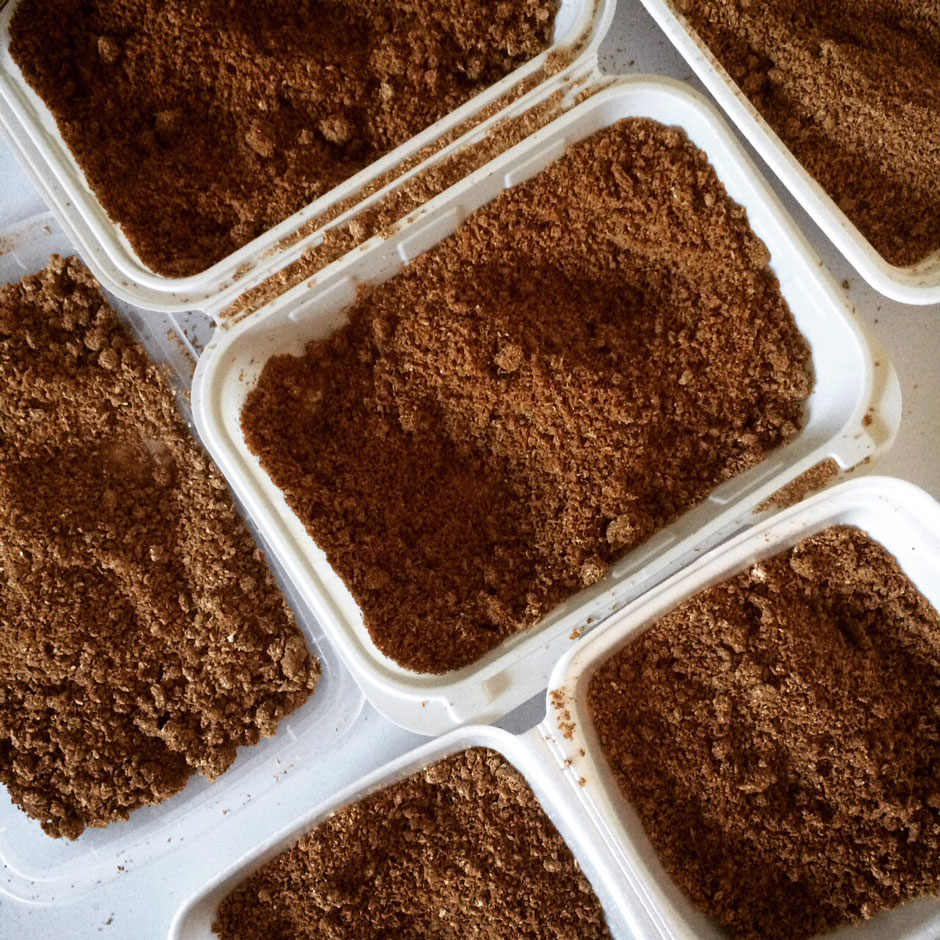
- Dry your flakes for long-term storage and use. Spread your bokashi flakes out in a thin layer on the floor or on a table to air out. You can do this in a tray, on a plate, or any other surface you don’t mind spreading flakes on. Heat and sunshine help speed things up.

Freshly fermented bokashi flakes drying in recycled take-out containers.
And that’s it! You’re ready to rock, roll and bokashi! 😀

To the compostessential,this is good stuff. Thank you as I am new to this whole agricultural thing this is my 5th month,I am presently going tunnel Hydroponic using chemicals To growing plants. Kindly forward me all info you have for me to start with composting,all kind of compost or all info from preparing a bed to planting. Wish for you and all those connected to you good times thanks and kind regards Vusi
Hello The Compostess, I was wondering if rolled oats can be used as a substitute for wheat bran?
Hi! Great question. I don’t see why not, though it may be more expensive to purchase rolled oats than wheat bran at, say, an animal feed store (I once scored a 50 lb. bag at a feed store for $17, not realizing quite how much that was — it took up the whole backseat!). People use all sorts of material: coffee chaff, old dried leaves, etc. If you give it a try, I’d love to hear how it goes! 🙂
I’m attempting this with coffee chaff and I think it weighs A LOT less than wheat bran. The volume to weight ratio seems quite different as 3lbs of coffee chaff has filled two small garbage cans and 3 cups of water won’t wet all this down. I’m instead attempting it with a tightly packed gallon baggie of chaff. I’ll let you know how it goes!
Hi, Alyssa! Thanks for sharing — super interesting. I think so long as the chaff is just dampened, vs. dripping, with the EM/water/molasses mixture, you’ll be in great shape. Can’t wait to hear how it goes!!!
I use (clean, new, unused by cats) Feline Pine as the base of my Bokashi flakes. Just add a bit more water to break it down to sawdust. Available anywhere http://oldandstriped.tumblr.com/post/79566649128/small-scale-nyc-apartment-sized-bokashi Also, you don’t need to bury the finished Bokashi fermented food waste, just add it to the outdoor compost bin of your nearby community garden, and cover well.
do you use an activated EM product or just the straight mother culture?
Hi! I use the EM straight out of the bottle, mixed with the water and molasses!
Will ‘high security size cuts’ of shredded newpaper work as a carbon source and will your method above for determining the right amount of moisture, apply if using shredded newspaper (as i’ve seen it done on your tube) although everything those videos didn’t go into detail about; you seem to have explained in detail with pictures included in your article above; your attention to detail is very much appreciated by beginners like me, Thank you.
Question one: At the end of the 4 week fermentation period for the inoculated (Newpaper flakes In my case), if i want to dry some of it for longer term storage would I follow your drying method above?
Question two :Won’t drying the inoculated flakes in the sun kill the EM1 microcrobes
that I’ve so worked so hard to grow?
Question 3: Can it be dried in the oven, if so at what temp for how long? how long would properly dried flakes last in a hot humid, rainy tropical climate?
4th Question how many Tablespoons of these inoculated bokashi flakes wheather fully fermented but not dried or fully dried would I use to sprinkle underneath and on top of my kitchen scraps when I toss them into my main bokashi bucket from from kitchen container once per day?
Hi Monica! Thanks so much for reaching out (and apologies for the delayed response…the comment section was acting up). As far as your questions go…you’ve probably done a lot of experimenting since then. I’d love to hear how your bokashi turned out! In case you’re still curious, here are a couple of responses….
1. Yup, I would give it a try!
2. I haven’t had or heard of any experiences where direct sunlight killed the microbes; they are pretty hardy! 3. You could try drying them in an oven at the lowest temperature setting — just in case! As far as living in a hot, humid, raining, tropical climate goes, you may want to store them in a container or plastic bag in the fridge to keep the material cool and dry.
4. You don’t need to sprinkle a ton on your scraps… Think of it like sprinkles on top of your ice cream or doughnut.
Hope this helps!
Hi! Just read your book and loved it! I am interested in making my own bokashi bran but was wondering if you could just mix the liquid ingredients and make a spray to ferment the food scraps, similar to the Urban Composter. Have you ever tried this? Thanks!
Hi there Stephanie! Thanks so much for checking out my book! 😀 I have never tried to mix the liquid ingredients and use them without the flakes, but I’d be really interested to hear how it works out for you if you give it a try! I think the main benefit of having the flakes is a bit more shelf stability. Let me know how it goes, and thanks for the comment!
I thought it had to be kept away from sunlight when drying?
Hi there, Noela! Thanks for the comment. I haven’t heard about sunlight affecting the drying process — what reason was provided when you encountered that info? I dry out my flakes indoors since I make them in my apartment, so there isn’t direct sunlight there. However, my guess would be that sunlight would facilitate drying.
Thanks for recipe! I have been trying to figure out composting and its do’s and don’ts, I think I finally found something that will work for me -Bokashi- and by making the bran myself it’s a lot cheaper for sure!